Concrete Projects
February 27, 2026
Concrete Sidewalks and Walkways
Thinking about installing or replacing a concrete sidewalk or walkway is a smart move. It improves curb appeal, enhances safety, and can increase your property’s value. But if you’ve never hired a concrete contractor before, it can be hard to know what to expect—especially when it comes to cost and the overall process.
This guide walks you through each step: how pricing typically works, what affects the final cost, and what the project timeline usually looks like from first phone call to finished walkway.
________________________________________
1. How Concrete Sidewalk Pricing Usually Works
Concrete sidewalks and walkways are typically priced by the square foot. The final price depends on:
• Size – Total square footage (length × width)
• Thickness – Standard walkways are often 4" thick, but heavier-use areas may need 5"–6"
• Site conditions – Slope, tree roots, demolition, access, and drainage issues
• Concrete type & finish – Standard broom finish vs. decorative (stamped, colored, exposed aggregate)
• Local labor & materials – Prices vary by region and season.
Common line items you might see on an estimate:
• Removal and disposal of existing concrete (if needed)
• Excavation and grading
• Base material (gravel/road base)
• Concrete supply and placement
• Reinforcement (rebar or wire mesh, if included)
• Joints (control and expansion joints)
• Finishing and curing
• Permits and inspections (if required)
• Cleanup and hauling away debris
Ask for an itemized estimate so you know exactly what’s included and what’s not.
________________________________________
2. Planning & Getting Quotes
Step 1: Define Your Needs
Before calling contractors, think through:
• Purpose: Basic access, decorative garden path, heavy foot traffic, wheelchair access?
• Location: Front walk, side of house, backyard patio connection, path to shed, etc.
• Width & layout: Typical walks are 3'–4' wide; busier paths might be 4'–5' or more.
• Look & style:
• Standard gray concrete with broom finish
• Colored concrete
• Stamped patterns (stone, brick, slate look)
• Exposed aggregate
• Timing: Any deadlines? Events, HOA requirements, or weather constraints?
Having a clear idea upfront helps contractors give more accurate bids.
Step 2: Contact Multiple Contractors
It’s a good idea to speak with at least 2–3 reputable contractors. When you reach out, be ready to share:
• Approximate size (or a rough sketch)
• Location on your property
• Access issues (fences, tight gates, steep slopes)
• Whether there’s old concrete to remove
• Preference for standard or decorative concrete
Ask each contractor:
• Are you licensed, insured, and bonded?
• How long have you been doing concrete work?
• Can I see photos of similar projects?
• What’s included in your estimate?
• What’s your payment schedule?
________________________________________
3. Site Visit & Estimate
Most contractors will schedule a site visit before giving a final price.
What Happens During the Visit
The contractor will typically:
• Measure the area to calculate square footage
• Assess slope, drainage, and soil conditions
• Check for obstacles (trees, roots, utilities, tight access)
• Ask how you plan to use the walkway
• Discuss layout, width, thickness, finish, and expansions joints
• Explain any code or permit requirements
After the visit, you’ll receive a written estimate. Review carefully:
• Scope of work (demo, base prep, concrete pour, finish, cleanup)
• Concrete thickness
• Type of finish
• Reinforcement (if any)
• Timeline and start date
• Warranty details
• Payment terms
________________________________________
4. Permits, Codes & HOA Rules
Depending on your area and the location of the walkway:
• Permits may be required, especially for:
• Public sidewalks
• Work near the street or property line
• Larger projects or changes to drainage
• Inspections might be needed before and/or after the pour.
• HOA rules may dictate color, style, or location.
Ask your contractor:
• Will you handle permits and inspections?
• Are permit fees included in the estimate?
________________________________________
5. The Installation Process: Step-by-Step
Once you approve the estimate and sign a contract, here’s how the project usually unfolds.
Step 1: Utility Marking
Before any digging:
• The contractor or you will contact local utility marking services.
• Underground utilities (gas, electric, water, cable) will be marked.
• This helps avoid dangerous and costly damage.
Step 2: Demolition & Excavation
If there’s old concrete:
• It’s broken up and removed.
• Debris is hauled away for disposal or recycling.
For new walkways:
• Grass, plants, and topsoil are removed.
• The area is excavated to the proper depth for base + concrete.
Step 3: Base Preparation
A solid base is crucial for a long-lasting walkway.
• Crushed stone or gravel is placed and compacted.
• The contractor grades the base to ensure correct slope for drainage.
• Edges are straightened and formed to the planned dimensions.
Step 4: Forms & Reinforcement
• Forms (usually wood or metal) are installed to outline the shape and thickness.
• Reinforcement:
• Some walkways get rebar or wire mesh.
• Some rely on proper base and control joints.
• Control joints and expansion joints are planned to help control cracking.
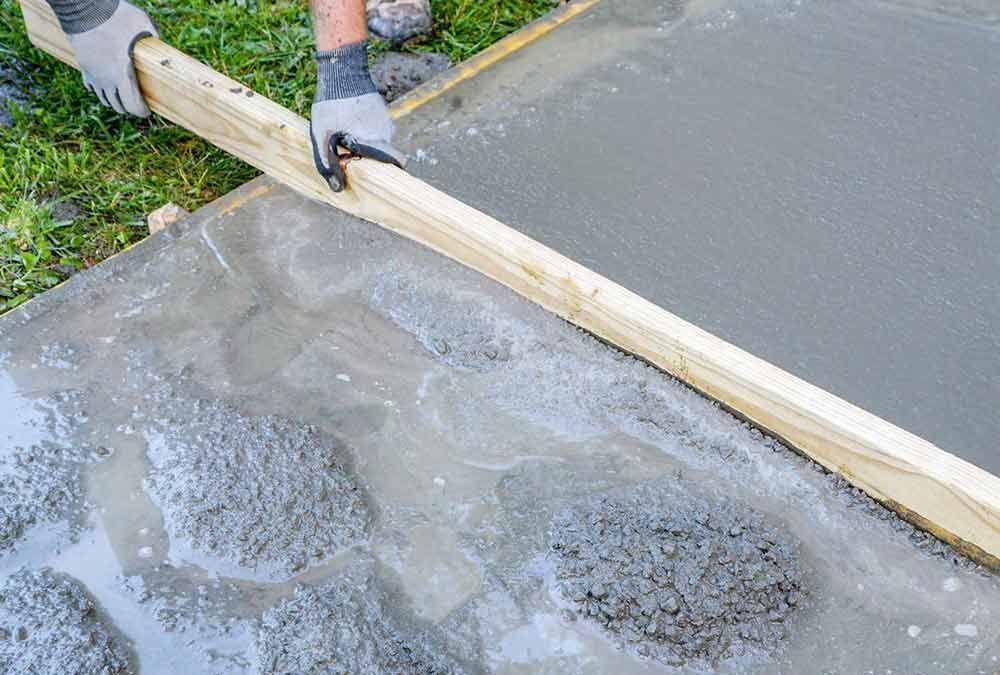
Step 5: Pouring the Concrete
On pour day:
• Concrete trucks arrive, or concrete is mixed on site.
• The concrete is placed, leveled, and screeded to the proper height.
• Edges are finished, and surface is smoothed.
For finishes:
• Broom finish: A broom is dragged over the surface to create traction.
• Stamped concrete: Patterns and textures are pressed into the surface.
• Exposed aggregate: Top layer of cement paste is removed to expose stone.
Step 6: Curing & Protection
Curing is critical for strength and durability.
• A curing compound or water curing method may be used.
• You may be asked to:
• Keep people and pets off for at least 24–48 hours.
• Keep vehicles off for several days (longer for driveable areas).
• Avoid placing heavy objects or using de-icing salt during early curing.
________________________________________
6. Timeline: How Long It Usually Takes
Exact timing will depend on weather, size, and complexity, but a typical pattern looks like:
• Planning & quoting: 1–2 weeks (depending on contractor availability)
• Permits / HOA approval (if needed): A few days to a few weeks
• On-site work:
• Demo & prep: 1–2 days for average residential walks
• Pour & finish: 1 day
• Curing before light use: 1–2 days
• Full cure: Concrete continues to cure and strengthen for about 28 days
Most homeowners can walk on the new walkway within 24–48 hours, depending on conditions and contractor guidance.
________________________________________
7. Payment: What’s Normal
Common payment structures:
• Deposit: Often 10–50% when you sign the contract or schedule the work.
• Progress payment: Sometimes after demo/base prep (for larger jobs).
• Final payment: After the pour and basic cleanup, or upon completion.
Red flags:
• Full payment required upfront
• No written contract
• Vague scope of work
Always get a written contract that outlines:
• Total price and payment schedule
• Detailed description of the work
• Start date and estimated completion date
• Warranty terms
• Who handles permits and inspections
________________________________________
8. What Can Affect Cost (or Cause Changes)
Even with a good estimate, some things can change the price:
• Hidden issues uncovered during demo (soft ground, buried debris, unexpected utilities)
• Extra excavation or fill needed
• Design changes you request after work begins
• Upgrades to decorative finishes or thicker concrete
Ask your contractor:
• How do you handle unforeseen issues or changes?
• How will change orders be documented and approved?
________________________________________
9. After the Pour: Care & Maintenance
To get the most life out of your new walkway:
• Follow your contractor’s curing instructions strictly.
• Avoid de-icing salts on new concrete for the first winter, if possible.
• Clean periodically:
• Sweep debris
• Rinse dirt and stains
• Seal the concrete (if recommended):
• Especially for decorative or colored concrete
• Helps protect from stains, weather, and freeze-thaw cycles
Hairline cracks can still occur in concrete over time, even with proper installation. Good contractors design joints and reinforcement to minimize and control where cracking happens.
________________________________________
10. Questions to Ask Before You Sign
Use this quick checklist:
1. Are you licensed, insured, and bonded?
2. Can I see recent projects similar to mine?
3. What thickness will the sidewalk be?
4. What base material and how much compaction do you use?
5. Will there be reinforcement (rebar/mesh)? If not, why?
6. How do you handle drainage and slope?
7. Who gets the permits and handles inspections?
8. What’s your warranty on materials and workmanship?
9. What is the exact payment schedule?
10. How should I care for the concrete after it’s installed?
________________________________________
Final Thoughts
Paying for a concrete sidewalk or walkway is an investment in both safety and curb appeal. When you understand how pricing works and what the process looks like—from estimating and permits to pouring and curing—it’s easier to budget confidently and choose the right contractor.
Take the time to plan your project, compare a few itemized quotes, and ask plenty of questions. A well installed concrete walkway should serve you reliably for decades.
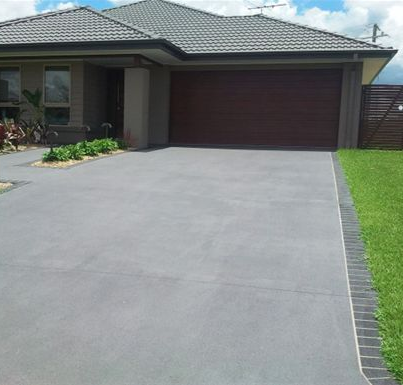
Upgrading or replacing a concrete driveway is one of the most impactful improvements you can make to your property. A well-built driveway boosts curb appeal, improves daily convenience, and can add real value to your home. If you’ve never hired a concrete contractor before, it helps to know what’s involved before you get started. This guide walks through how concrete driveways are typically priced, what affects the cost, and how the installation process usually unfolds—step by step. ________________________________________ 1. How Concrete Driveway Pricing Usually Works Most driveways are priced by the square foot. Your final cost depends on several key factors: • Size: The total area (length × width) • Thickness: Standard residential driveways are often 4"; heavy vehicles may require 5"–6" • Site conditions: Slope, access, soil quality, tree roots, and existing driveway removal • Concrete mix and finish: Standard gray broom finish vs. decorative (colored, stamped, exposed aggregate) • Local market: Regional labor and material rates, plus seasonal demand Common line items on a driveway estimate include: • Demolition and removal of existing driveway (if needed) • Excavation and rough grading • Base material (gravel or road base) and compaction • Concrete delivery and placement • Reinforcement (rebar, wire mesh, or fibers, if included) • Saw-cut or tooled control joints • Finishing and curing • Permits and inspections (where required) • Cleanup and haul-away of debris Always request an itemized estimate so you can see exactly what’s included and make fair comparisons between contractors. ________________________________________ 2. Planning Your Driveway Project Before calling contractors, it helps to clarify a few basics: • Vehicle use: Everyday cars only, or heavier loads (RVs, boats, work trucks)? • Layout: Straight, curved, circular, or additional parking pads? • Size: • Standard single-car: ~10'–12' wide • Two-car: ~18'–24' wide • Extra width for parking or turnarounds, if needed • Finish and appearance: • Standard gray with broom finish for traction • Colored concrete added into the mix or applied at the surface • Decorative stamping to mimic stone, brick, or pavers • Exposed aggregate for added texture and curb appeal • Timing: Are you trying to coordinate with a home sale, renovation, or seasonal weather window? Having a general plan in mind allows contractors to provide more accurate pricing and design suggestions. ________________________________________ 3. Getting Quotes and Evaluating Contractors Contact at least 2–3 established concrete companies. Be prepared to share: • Approximate driveway dimensions • Current driveway material and condition • Any noticeable drainage issues or low spots • Access challenges (narrow streets, steep slopes, tight side yards) • Your interest in standard or decorative concrete Questions to ask each contractor: • Are you licensed, insured, and bonded? • How many years have you been installing concrete driveways? • Can I see photos or addresses of recent driveway projects? • What exactly is included in this estimate? • How is your payment schedule structured? Compare more than just price—experience, communication, and clear scope of work matter just as much as the bottom line. ________________________________________ 4. Permits, Codes, and HOA Rules Not every driveway requires a permit, but many municipalities and HOAs have rules you’ll need to follow. Depending on your location: • Permits may be needed for: • New driveways connecting to the street • Changes to driveway width or location • Work in the public right-of-way or near sidewalks/curbs • Inspections might be required at base and/or final stages. • Homeowners associations may dictate materials, colors, or maximum width. Ask your contractor: • Will you handle permits and coordinate inspections? • Are permit and inspection fees included in your proposal? ________________________________________ 5. How a Concrete Driveway Is Installed Once you approve the estimate and sign a contract, the installation process typically follows these stages. Step 1: Utility Marking Before digging: • You or your contractor contact local utility marking services. • Underground lines (gas, electric, water, sewer, cable) are marked. • This helps prevent dangerous and costly damage. Step 2: Demolition and Excavation For replacement driveways: • The old surface (concrete, asphalt, gravel, or pavers) is broken up and removed. • Debris is hauled away for disposal or recycling. For new driveways: • Grass, topsoil, and vegetation are removed. • The area is excavated to the required depth for both base and concrete thickness. Step 3: Base Preparation A solid base is critical for a long-lasting driveway: • Crushed stone or road base is placed and compacted in layers. • The base is graded to promote proper drainage away from the house and garage. • Edges are shaped to match the planned driveway footprint. Step 4: Forms and Reinforcement • Forms (usually wood or metal) are set to define the driveway’s shape, slope, and thickness. • Reinforcement may be installed, depending on design and local conditions: • Rebar grid • Wire mesh • Synthetic fibers in the mix • Control joints and expansion joints are laid out to help control where cracking occurs. Step 5: Pouring and Finishing On pour day: • Concrete is delivered in ready-mix trucks or mixed on site. • The concrete is placed, leveled, and screeded to the proper height. • The surface is floated and edges are tooled. • The final finish is applied: • Broom finish for traction • Stamped patterns for decorative drives • Exposed aggregate for a textured, upscale look Step 6: Curing and Protection Proper curing is critical to long-term durability: • A curing compound may be sprayed, or other curing methods used. • You’ll be advised to: • Keep people and pets off for at least 24–48 hours. • Keep vehicles off for several days to a week or more, depending on thickness and conditions. • Avoid de-icing salts during the first winter, if possible. ________________________________________ 6. Typical Timeline for a Concrete Driveway Timing will vary with project size, weather, and contractor availability, but a typical pattern is: • Planning and getting quotes: 1–2 weeks • Permits and HOA approvals (if needed): Several days to a few weeks • On-site work: • Demolition and base prep: 1–3 days for most residential driveways • Pour and finish: Usually 1 day • Curing: • Light foot traffic: Often allowed after 1–2 days • Vehicle traffic: Usually allowed after 5–7+ days, per contractor guidance • Full cure: Concrete continues to gain strength for about 28 days ________________________________________ 7. Payment Structures and Red Flags Most concrete driveway projects use a staged payment schedule: • Deposit: Typically 10–50% when scheduling and signing the contract • Progress payment: Sometimes after demolition and base prep for larger jobs • Final payment: Due after the pour and basic cleanup, or upon completion Be cautious of: • Requests for 100% payment upfront • No written contract • Vague description of scope, materials, or thickness Your contract should clearly state: • Total price and payment schedule • Driveway thickness, reinforcement, and finish • Start date and estimated completion window • Warranty terms • Responsibility for permits and inspections ________________________________________ 8. Factors That Can Change the Price Even with a good estimate, some issues may affect the final cost: • Unstable soil or buried debris discovered during excavation • Additional base material required for proper support • Homeowner-requested design changes mid-project • Upgrades to thickness, reinforcement, or decorative finishes Ask your contractor how they handle: • Unforeseen conditions • Change orders and how they’ll be documented and approved ________________________________________ 9. Long-Term Care for Your Concrete Driveway To get the longest life from your driveway: • Follow your contractor’s curing recommendations. • Avoid de-icing salts on new concrete for at least the first winter. • Keep the surface clean: sweep debris and rinse off dirt, oil, and stains. • Consider sealing: • Particularly important for decorative or colored concrete • Helps protect against moisture, stains, and freeze-thaw damage Hairline cracks can occur in any concrete over time. A good installation—with proper base, reinforcement, and joint placement—is designed to control where and how those cracks appear. ________________________________________ Final Thoughts A concrete driveway is a long-term investment in your home’s appearance and functionality. By understanding how pricing works and what the process looks like—from the first estimate to final curing—you’ll be better prepared to choose a contractor and oversee the project with confidence.